Blue Lake: How to Visit This Spectacular Lake In 2026

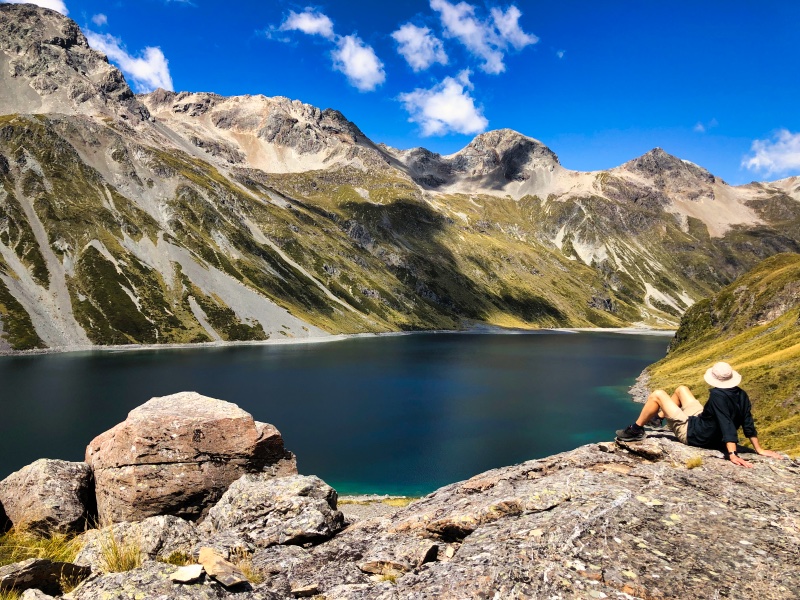
Lake Rotomairewhenua (also referred to as Blue Lake) is fast becoming one of New Zealand’s star attractions. I mean, not every lake can claim to be the clearest freshwater in the world, right?
Blue Lake is truly awesome and to boot, the Blue Lake walk is an awesome tramp and full of beauty of its own.
Whether you’re a visitor to New Zealand or a tried and true local, Blue Lake Nelson is definitely worth a visit and a top thing to do on New Zealand’s South Island.
Want to know how to get to Blue Lake Nelson? Well, lucky you, you’re in for a great time.
Read on for our complete guide, outlining all you need to know to visit Rotomairewhenua, aka Blue Lake Nelson.
New Zealand Travel Resources
- Getting there: search for flights to New Zealand
- Guidebook: pick up a Lonely Planet New Zealand guidebook
- Where to stay: search for hostels and hotels
- Getting around: search for buses
- Rent a car: search for deals on car rentals
- Travel insurance: get travel insurance for your trip
- Money: get a Wise travel card to save big time in New Zealand
- Tours: check out the best New Zealand tours
Blue Lake Nelson: Overview
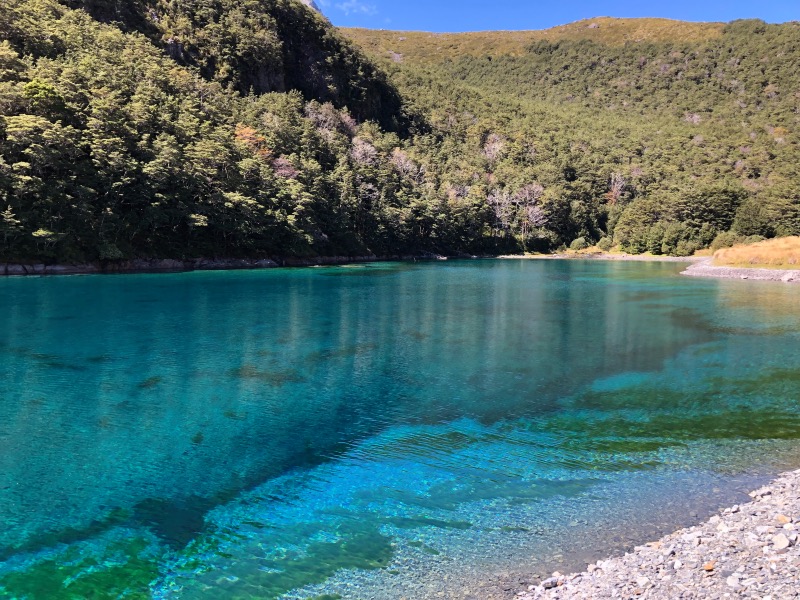
Rotomairewhenua is the clearest tested freshwater in the world.
We say ‘tested’, because, well, we’ve seen a lot of clear water out there, in places where they don’t have the resources to test it.
Moving on. Blue Lake’s visibility ranges from 70 to 80 metres, which is close to pure water – the visibility of distilled water is about 80 metres. That’s damn clear.
Related: Angelus Hut – How to Visit New Zealand’s Most Spectacular Hut
Hidden deep in the backcountry, Blue Lake Nelson is truly a sight to behold.
Anyone with even the slightest appreciation of nature can’t help but be awed by the beauty of this tiny lake.
Blue Lake Nelson is considered sacred to the local Māori population. Rotomairewhenua translates to “the lake of peaceful lands”.
Historically, the lake was used by the Ngati Apa ki te Ra To iwi to cleanse the bones of deceased men, aiding their spirits on their journey to the afterlife.
For this reason (and to protect the clarity of the lake), visitors are not allowed to enter the water. Please don’t be a dickhead and jump in the water.
Rotomairewhenua / Blue Lake Location
Rotomairewhenua is located deep inside Nelson Lakes National Park, on the south island of New Zealand.
Nelson Lakes National Park is located just outside of the teeny tiny village of St Arnaud, which is 81 km south of Nelson.
Note: Rotomairewhenua is the Blue Lake near Nelson. There is another Blue Lake in New Zealand, in Rotorua. Confusing, I know! We are not referring to that one.
There’s not a lot going on in St Arnaud, and not much in the way of supplies, so Nelson is the best place to base yourself to get organised for hiking to Blue Lake hut.
How to Get to Blue Lake Nelson
There are a couple of different ways to reach Blue Lake Nelson, but no matter which you choose, it requires at least a couple of days of backcountry hiking. But that’s the fun part, right?
You can get to Blue Lake Nelson via the Lake Rotoroa water taxi, hiking from the Mount Robert car park, or as a side trip on the Travers Sabine Circuit.
Want another great hike near Nelson? Check out the Tableland Circuit
Getting to Blue Lake Nelson via Lake Rotoroa Water Taxi

The most straightforward, and easiest way to get to Blue Lake Nelson, is via the Lake Rotoroa water taxi.
From Lake Rotoroa, you can take a water taxi to Sabine Hut. This leaves from the Lake Rotoroa jetty and costs $65 per person with a minimum charge of $210. Convenience isn’t cheap!
Once you’ve reached Sabine Hut, walk to West Sabine Hut (approximately 5 hours). From West Sabine Hut you can access the Blue Lake Track that leads to Blue Lake Hut (around 3.5 hours).
Once you’ve spent the time you want at Rotomairewhenua and Blue Lake Hut, simply return the way you came.
Heading to Auckland? Check out the Top 5 Coolest Neighbourhoods in Auckland
Getting to Blue Lake Nelson via Mount Robert Car Park
To hike the entire way to Blue Lake Nelson, you can walk from Mount Robert car park.
From Mount Robert car park, hike to Sabine Hut (17.5 km and around 7 hours). If you would like to break up the journey, you can spend the night at the adorable Speargrass Hut.
From Sabine Hut, continue to West Sabine Hut and then to Blue Lake Hut as noted above.
Getting to Blue Lake Nelson via Travers Sabine Circuit
Another option, and a really fun one, is to incorporate a trip to Blue Lake Nelson as part of the Travers Sabine Circuit.
Read our complete guide to the Travers Sabine Circuit
Best time to do the Blue Lake Hike

The best time to do the Blue Lake walk is from December to February. This is during New Zealand’s summer and you can expect warm days with pleasant evenings.
Do note that as this is an alpine region, and New Zealand has temperamental weather, heavy rain can occur at any time and nights can get very cool, even in summer.
For tips on what to pack for Blue Lake, check out our complete mountain packing list.
The official season for hiking the Blue Lake walk is from November to April.
During the shoulder months of November, March and April, days will be cooler, nights much colder and rain more frequent.
Read: How to Conquer the Heaphy Track – The Essential Hiking Guide
Transportation to the Blue Lake Track
Nelson to St Arnaud
To get to Rotomairewhenua, you must first get to St Arnaud. From Nelson, you can get to St Arnaud by your own car, hitchhiking, or a shuttle.
Car
If you have your own wheels, it’s an easy, 1.5-hour drive to St Arnaud from Nelson. You can park your car either at Kerr Bay or the Mount Robert Car Park.
Don’t have your own set of wheels and need to rent a car? We personally use and recommend Discover Cars.
Hitchhiking
If you don’t have your own set of wheels, you can always try your hand at hitchhiking to/from the trailhead.
Hitchhiking, especially among hikers, is relatively common in NZ, so drivers are used to seeing and picking up people who need lifts.
However, that said, there seems to have been an increase in hitchhikers in recent years, meaning increased competition for a valuable seat.
If you try early enough, you should be able to get a ride in either direction.
As a note of confidence, we hitchhiked from St Arnaud to Nelson at the end of the Travers Sabine Circuit, and despite having to wait 3 very long hours, did manage to get a lift.
Trek Express Shuttle
Trek Express offers shuttle services from Nelson to many of the surrounding trailheads, including both St Arnaud and Mount Robert Car Park. Prices range from $55 – $75 pp and a minimum of 5 people are needed to make a trip.
Trek Express has a helpful ‘existing trips’ page on its website where you can find a list of upcoming trips to join if you don’t have the requisite numbers to charter a shuttle.
St Arnaud to Blue Lake Track Trailhead
Once you are in St Arnaud, you must then get to either Kerr Bay or Mount Robert car park (depending on how you are getting to Blue Lake Hut).
Kerr Bay is a 5-minute walk from the DOC visitor’s centre in St Arnaud. Simply head down Kerr Bay Road towards the lake and you’ll find the trailhead easily.
Mount Robert car park is a further 6 km up the hill from St. Arnaud.
If you are starting the Blue Lake walk from here, you can drive and park your car, walk or hitch a lift.
It takes approximately 1.5 hours to walk to this trailhead from town.
Read: The Complete Guide to Hiking Mt Arthur
How much does it cost to hike to Blue Lake Hut?
There are no fees to enter New Zealand National Parks or to use the trails.
You must pay to use the huts and/or to camp within 50 metres of a hut.
Blue Lake Hut and all the other huts on the way to Blue Lake Hut cost $25 NZD per person per night. Camping outside any of the huts costs $10 NZD per person per night.
Outside of these fees, you will also have to pay for your food, supplies and transportation to/from St Arnaud.
How difficult Is the Hike to Blue Lake?
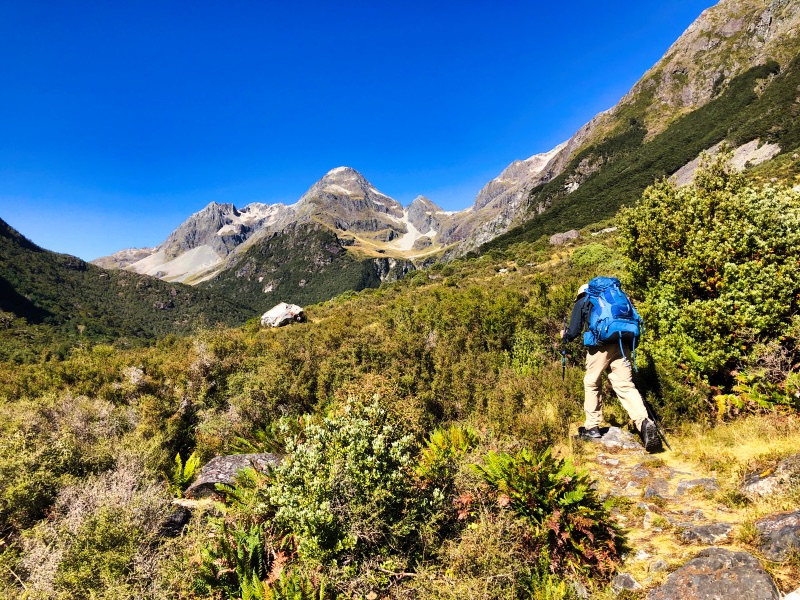
No matter which way you get there, the Blue Lake walk is challenging.
The route from Mount Robert car park, while moderate, is long and contains just enough ascents and descents and difficult terrain to keep you on your toes.
The Blue Lake Track, which runs from West Sabine Hut to Blue Lake Hut, is challenging.
While short (at around 8 km), it’s steep, with almost 600 metres of elevation gain. The track is technical at times and requires climbing over steep rocks and boulders.
What to expect on the hike to Blue Lake Nelson
Huts
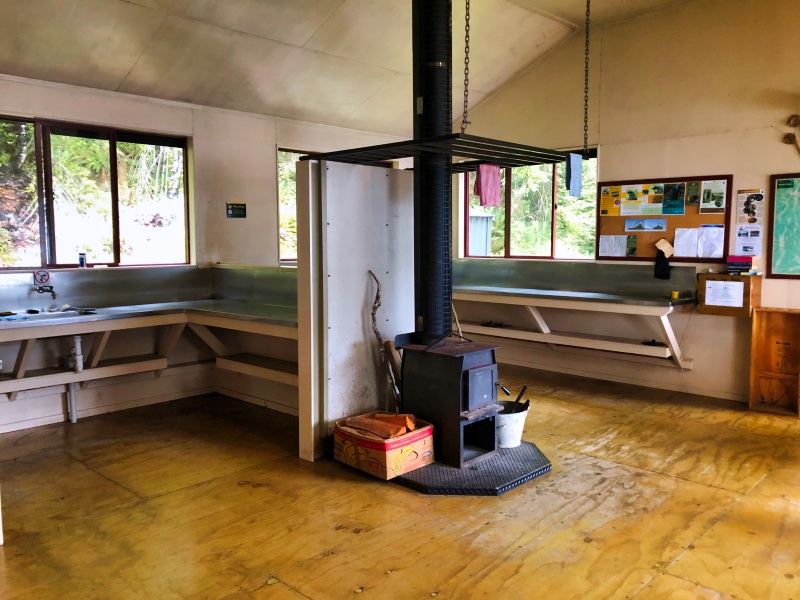
All huts along the way to Blue Lake Nelson (including Blue Lake Hut), are serviced huts.
This means they have mattresses, water supply, toilets, hand-washing facilities (but usually not soap) and a fireplace for heating.
The huts do not have cooking facilities (i.e., gas) so ensure you bring your own supplies.
Fuel canisters can be purchased around Nelson at several places, but we found MD Outdoors to have the best prices.
None of the huts have electricity (i.e., lighting), so people usually go to bed and wake up with the sun’s natural cycle. A headlamp is useful!
It’s also worth noting that none of the toilets have toilet paper, so make sure you bring your own.
In peak hiking season, the huts can become quite busy.
Fortunately, people are generally respectful and staying in a hut is a great opportunity to meet some interesting people from all around the world.
How to pay for huts and camping along the Blue Lake Track
Although you cannot book any of the huts on the hike to Blue Lake Nelson in advance, you must pay for your huts in advance.
To stay in the huts along Blue Lake Track, including Blue Lake Hut, you must purchase Backcountry Hut Tickets from any Department of Conservation (DOC) office.
The DOC office in Nelson is centrally located and has very helpful staff who can answer any questions you may have.
Each hut along the Blue Lake hike requires 1 x blue ticket and 1 x green ticket each.
When you’re at the hut, simply fill in the dates on the tickets and put the stubs in the honesty box inside the hut. Hut wardens may come to inspect your tickets to ensure you’ve paid.
Camping
You can also camp on the way to Blue Lake Nelson.
Each hut has a designated camping area. It costs $10 NZD per person per night to camp within 50m of a hut.
To pay for this, purchase a blue ticket in advance (see above) and put it in the honesty box at the hut.
Weather
The weather on the Blue Lake Track will depend on which season you hike in.
If you do the hike to Blue Lake Nelson during the summer, from December to February, then you can expect warm days and mild evenings.
That said, the weather in New Zealand’s mountains is fickle and can change at any time: heavy rain and freezing conditions can occur, even in summer.
Be sure to pack appropriately! Don’t worry, we’ve got you covered – see our ultimate mountain hiking packing list.
Water
Generally speaking, water is abundant on the Blue Lake Track and you never have to carry much at any given time.
Any running water found along the hike to Blue Lake Nelson is generally safe to drink and doesn’t need to be treated – it’s also usually delicious!
You should treat all water at the huts, however, as this is sitting rainwater and can be contaminated by bird and possum droppings.
Pro tip: for treating water on all our hikes, we use a Steripen – it’s a game-changer.
Food
There are no facilities to purchase food on the hike to Blue Lake Hut, so you must bring all the food you need for the duration of your trek.
Backcountry meals are very popular, because they are light and easy to prepare, if not a bit expensive.
They can be purchased at many places in Nelson, including the supermarket and speciality outdoor stores. We prefer the Radix Meals, which can be found at MD Outdoors.
If you would like to prepare your own food, instant noodles, pouches of beans, chickpeas and tuna, couscous and instant pasta packages are all great options.
Pro tip: add dehydrated shitake mushrooms to your meals. They’re lightweight and have a lot of nutrition. They can be purchased at the supermarket and need to be soaked in cold water for 20 minutes before being cooked. (We actually discovered this trick from watching other hikers whilst on the Heaphy Track).
Rubbish
Pack it out, folks! Make sure to bring a bag to collect your garbage and take it out so you can Leave No Trace.
Please, please do not throw your rubbish out on the trail or leave it in the huts.
Pro tip: to minimise rubbish on the trail, decant as much of your food beforehand as possible.
Safety
Even though the Blue Lake walk has good facilities and a well-marked trail, it is still a relatively isolated trek.
We highly recommend walking with a personal locator beacon (PLB) or similar device in case of any emergencies.
If you don’t want to shell out the few hundred dollars to buy one of these, you can rent a PLB at MacPac in Nelson.
Travel insurance, as always, is essential. If something goes wrong, you want to be covered. Our preference is SafetyWing. Trust us, we’ve used a lot of travel insurance and they really are the best.
Navigation
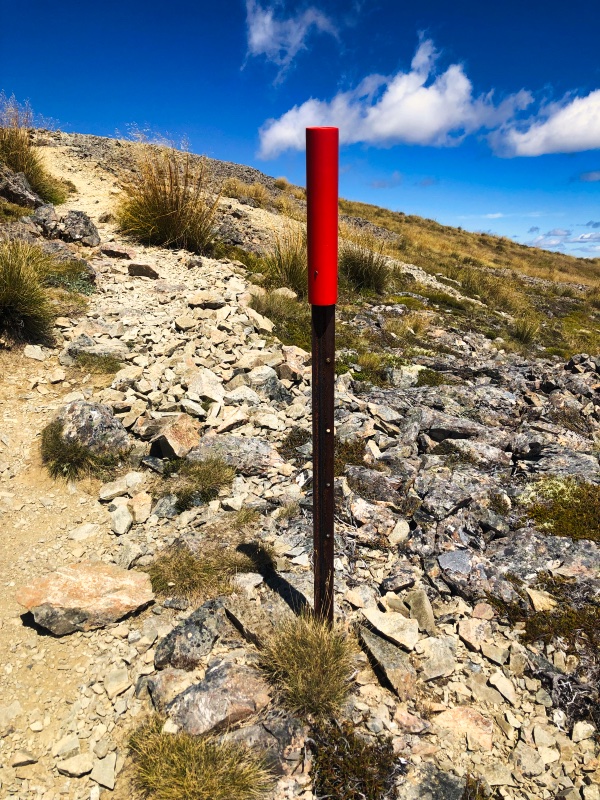
It is pretty easy to navigate the Blue Lake Track. There are numerous, clear trail markers along the trail which are easy to follow.
You don’t need a physical map, but it’s a very good idea to have an offline map downloaded in advance. We recommend using AllTrails for reliable trail maps and navigation, along with maps.me as a backup.
If you would like to purchase a physical map of the Travers Sabine Circuit, you can do some from the DOC office in Nelson.
Mobile Reception and Electronics
There is very limited mobile reception along the Blue Lake Track, so do not depend on it. You can normally only access it from a few high points.
There are no places for charging your electronics on the trail, so we recommend bringing a power bank to keep your devices fully juiced.
Blue Lake Walk Sections
Section 1: Mount Robert Car Park To Speargrass Hut
- Distance: 6.5 km
- Time: 3 hours
- Elevation: + 180m / – 80m
- Difficulty: Moderate
Leaving Mount Robert car park, the track to Speargrass Hut undulates a lot. The track is mostly roots and boulders under the bush canopy.
After rain, it can be very muddy and boggy.
At the end, you’ll find Speargrass Hut (12 bunks). Speargrass Hut is super cute with nice views of the mountains and tussock.
The sandflies at the hut are also not terrible, allowing you to enjoy the veranda.
Section 2: Speargrass Hut to Sabine Hut
- Distance: 11 km
- Time: 4 hours
- Elevation: + 115 m / – 605 m
- Difficulty: Moderate
The section starts with a moderate climb to a benched rest area (with 4G reception!). Then, there is a very long boardwalk.
From this point, the trail undulates a little, with occasional views of the lake.
Sabine Hut (32 bunks) is wonderful, with incredible views of Lake Rotorua.
Despite the abundance of sandflies, it’s an inviting place to spend the night. The large picture windows allow you to enjoy the view bite-free.
You can also enjoy sunsets over the lake from the hut’s jetty.
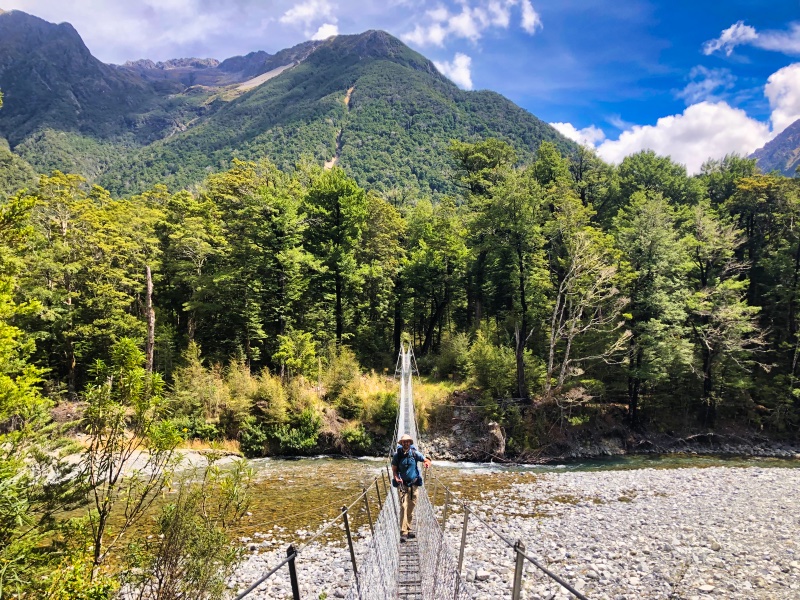
Section 3: Sabine Hut to West Sabine Hut
- Distance: 15 km
- Time: 4.5 – 5 hours
- Elevation: + 230m
- Difficulty: Moderate
Overall, this is not a particularly scenic section – except for one major highlight.
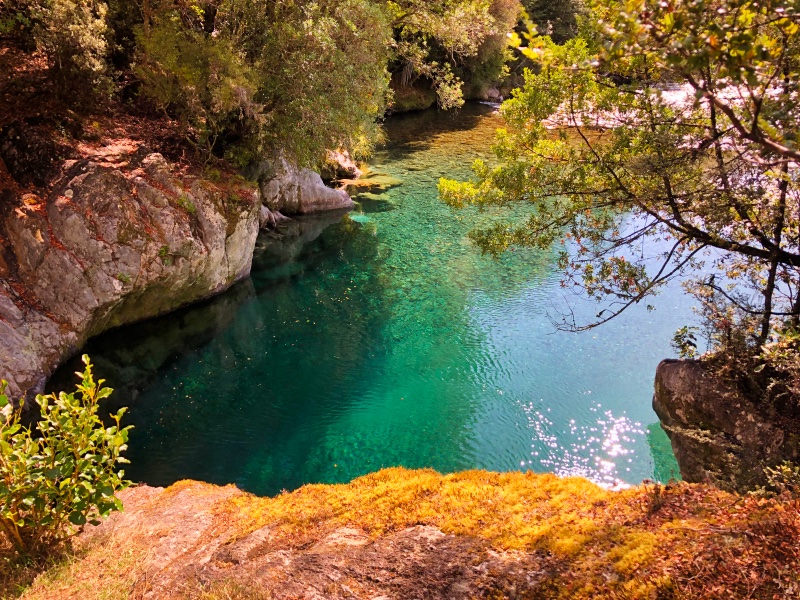
About 40 minutes after leaving Sabine Hut, the trail crosses a bridge over a stunning aquamarine gorge. The water here is some of the most beautiful we have ever encountered.
If you look around, you will find a rock about 2 – 3 metres above the water that is an ideal spot for safely jumping from. You can swim to the bank, where there is a trail up.
Continuing on to West Sabine Hut, it is pretty tough going as the trail is pretty rocky with lots of exposed tree roots.
The trail undulates a lot, with some flat sections in tussock.
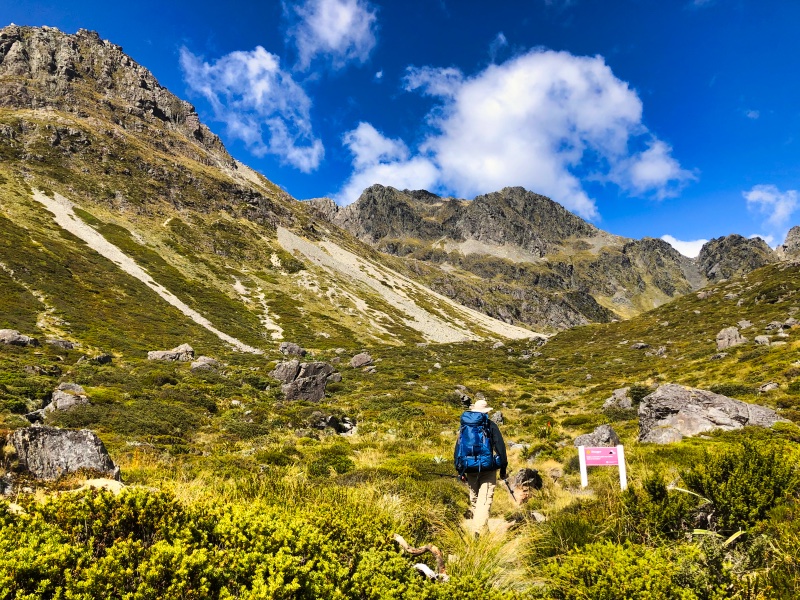
West Sabine Hut to Blue Lake Hut
- Distance: 7.5 km
- Time: 3 – 3.5 hours
- Elevation: + 520m
- Difficulty: Moderate to difficult
The Blue Lake Track is a manageable section with 2 steep and challenging parts.
After about 2 hours of hiking, the valley opens up with views of Moss Pass and Mt Cupola (2260m). This has some of the best scenery on the entire Travers Sabine Circuit.
The Blue Lake Track then goes back into the bush and becomes much steeper.
At one point, you climb a series of large and slippery rocks parallel to the raging river.
Blue Lake Hut (16 bunks) is set above the lake near the bush line and is a beautiful spot to spend the night.
Remember: You are not allowed to contaminate the lake in any way – this means no swimming, drinking from or even camping near the lake (you can camp near the hut).
You can bathe yourself from the point at which the water exits Blue Lake – there will be signs pointing in the right direction. The water here tastes delicious.
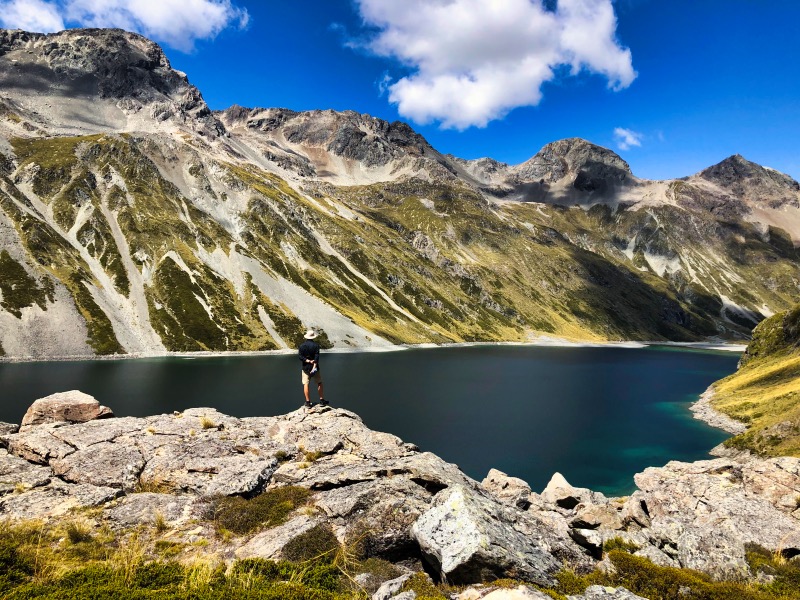
We highly recommend hiking to the viewpoint of Lake Constance. It is around 1 km with 220 metres of elevation gain and takes 45 minutes (with no packs).
This has some of the most incredible mountain scenery in the entire Nelson Lakes National Park, plus aerial views of Blue Lake and Lake Constance.
Be sure not to ascend the scree towards the Waiu Pass!
Tips and tricks
- Bring hiking poles. They’re not only useful for the ascents and descents but testing rock stability, and mud depth and for helping cross rivers and streams.
- Make sure your boots have Gore-Tex. This will greatly help with the water crossings.
- Get to Blue Lake Hut early in the day. The Blue Lake walk is quickly gaining popularity, so you’ll want to secure a bunk early – plus have time to explore this beautiful area.
- From Blue Lake Hut, walk up to the view of Lake Constance. This is one of the best views in the entire national park.
- Bring earplugs for the huts. Trust us on this.
- Bring sandals, crocs or any comfortable footwear for the huts. Your feet will thank us.
Where to stay in Nelson Before and After the Hike
Budget
Mid-range
High-end
Disclaimer: This post may contain affiliate links. If you buy or book anything through them, we’ll earn a small commission at no extra cost to you. Thank you for supporting this website!